Installing Boxcoin
To install Boxcoin on your server follow the steps below:
- Open the zip file boxcoin 1.2.3.zip and extract the folder in a server location of your choice.
- Navigate to the link https://[your-site]/boxcoin/admin.php and complete the installation. Replace [your-site] with your website URL. If you changed the directory name, replace boxcoin with the new directory name.
- Once the installation is complete, log in with the username and password entered in the previous step and save the addresses of your cryptocurrency wallets in Settings > Cryptocurrency addresses. Mind that some cryptocurrency require an API key or a node to work, more details here.
- If you are using an integration, complete the installation as explained here.
- You are done! You can start creating your first checkout.
Minify JS
For performance reasons, you may want to load the minified client.js file: [YOUR-URL]/js/client.min.js. Please note that if you contact us for support you will need to load again the non-minified version.
Site migration
If you migrate the script to a new domain or URL you need to edit the config.php file (it's in the Boxcoin folder) and update the BXC_URL constant with the new URL.

To install Boxcoin on WordPress follow the steps below:
- Go to the Plugins page and click Add new then Upload plugin and upload the zip file boxcoin 1.2.3.zip.
- Once the installation is complete you should see a new left menu item named Boxcoin.
- Save the addresses of your cryptocurrency wallets in Boxcoin > Settings > Cryptocurrency addresses.
- If you are using WooCommerce complete the installation as explained here.
- If you are using Easy Digitial Downloads complete the installation as explained here.
- If you are using an integration, complete the installation as explained here.
- You are done! You can start creating your first checkout.
The cloud version requires no installation. You just have to copy and paste the embed code, or you can use the direct payment link. If you include multiple checkouts on the same page, please note that you only need to include the <script id="boxcoin" src="https://cloud.boxcoin.dev/js/client.js?cloud=MVdDMnZXe..."></script> script code portion of the embed code once.
Whitelist
To increase the security of Boxcoin you can create a whitelist of approved cryptocurrency addresses. Checkout addresses and any transfer of funds will be blocked if the address is not whitelisted. To create the whitelist, edit the config.php file in the Boxcoin installation directory and add the constant define('BXC_WHITELIST', []). The value must be an array containing all the addresses saved in Settings > Cryptocurrency addresses, e.g. define('BXC_WHITELIST', ["bc1qnggf72xfeh8as54", "DEqc4RNjKOdkl0xHH"]).
- This security measure is not required if you are using the cloud version.
- Once the constant is declared, all addresses from Settings > Cryptocurrency Addresses must be included.
- This security check is skipped for the checkout address if the address is dynamically generated via Gemini, Coinbase, Custom explorer or other functions.
- The address verification is performed in the following cases: to verify the checkout payment address, to verify the address of a transfer on your wallet.
- If the address verification fails, an error will be displayed in the browser console.
- Address verification fails if the address saved in Settings > Cryptocurrency addresses is not found in the BXC_WHITELIST constant.
Required API keys and Nodes
The following cryptocurrencies require an API key or a node to work.
- XRP You need a Blockdaemon API key. Enter the key in Settings > API keys.
- BNB You need an openexchangerates.org API key. Get the key from https://openexchangerates.org. Enter the key in Settings > Open Exchange Rates App ID.
- BSC, USDT and OTHER CRYPTOS on BSC network You need an openexchangerates.org API key. Get the key from https://openexchangerates.org. Enter the key in Settings > Open Exchange Rates App ID. You need a Tatum API, get it from https://tatum.io. Enter the key in Settings > API keys > Tatum. You can also use a paid (free accounts are not supported) Etherscan API. Get it from https://etherscan.io/apis. Enter the key in Settings > API keys > Etherscan.
- SOL You need a Solana node. Enter the node information in Settings > Solana node. More details here.
- XMR You need to save your Monero secret viewkey in Settings > Monero secret viewkey. For more details about Monero click here.
- ZEC You need to run a Zcash node. Enter the node details into Settings > Zcash node. For more details about nodes click here.
Requirements
- Your web project must support HTML and PHP, and pages containing a checkout must be opened via a web browser.
- You cannot display the checkout on a HTML page opened directly on a local computer. Use a local server like Xampp instead.
- Your server must allow the access of the following file: boxcoin/ajax.php
- If you're using the WordPress version of Boxcoin and you have any security plugins installed, please make sure that they don't block the boxcoin/ajax.php file.
- PHP 7.4+
- The following PHP extensions are required: CURL, ZIP ARCHIVE, GD extension.
- The following PHP extensions are optional but some optional Boxcoin feature requires them: GMP.
- MySQL - The SQL mode "ONLY_FULL_GROUP_BY", and the setting "ANSI_QUOTES", must be disabled.
- PHP modules: gmp, zip archive, cors. All required PHP modules should already be active by default.
Creating your first checkout
- Create the checkout from the Checkouts area or via code.
- Insert the Embed code on your website page, in the position where you want to show it.
-
Include the following script into the <head></head> or <footer></footer> area of the page where the checkout is shown.
Include it only once per page (also if there are multiple checkouts on the same page).
Replace [YOUR-URL] with the URL of your Boxcoin installation, e.g. https://example.com/boxcoin/js/client.js.
<script id="boxcoin" src="[YOUR-URL]/js/client.js"></script>
- If you are not using an integration, use the webhook to validate and finalize the purchase. For security reasons you should always validate the purchase via webhook. Use the redirect checkout option to redirect the customer to a new page after the purchase is complete. Use the JS event BXCTransactionCompleted to execute a JS code after the purchase is complete. See the JS events for more details.
- Create the checkout from WordPress left menu > Boxcoin > Checkouts or via code.
- Insert the checkout shortcode into the page of your website where you want to show it.
- Create the checkout from the Checkouts area or via code.
- Insert the Embed code on your website page, in the position where you want to show it.
- If you are not using an integration, use the webhook to validate and finalize the purchase. For security reasons you should always validate the purchase via webhook. Use the redirect checkout option to redirect the customer to a new page after the purchase is complete. Use the JS event BXCTransactionCompleted to execute a JS code after the purchase is complete. See the JS events for more details.
Information
- To understand how Boxcoin detect the payments see the address generation section.
- The checkout page should not be closed before the payment is completed. If it's closed, the cron job function will still check payments but you should set it to run from your server, more details here.
Activation
To activate the Boxcoin and enable all features (including updates and more secure encryption), you need to enter the Envato purchase code in Settings > Envato purchase code.
Find your Envato purchase codeUpdates
- To update Boxcoin, click the button Settings > Updates > Update now.
- You can also activate automatic updates via Settings > Updates > Automatic updates.
- To enable updates you need to have a valid Envato purchase code.
- If you're using the WordPress version of Boxcoin, keep in mind that you cannot update Boxcoin from the WordPress plugins page.
Manual updates
To manually update Boxcoin, download it again from CodeCanyon and replace all the files of your installation with the new files from the downloaded CodeCanyon package.
Having Problems?
If you're having any issues at all, please contact our friendly support team at support@boxcoin.dev. Before contacting us, please make sure that your server has all the requirements listed above. On that same note, if you are using the WordPress version, please make sure that your WordPress installation has all the requirements listed above.
Payment not detected - Pending transaction
If you have sent a cryptocurrency payment and Boxcoin does not detect it (pending transaction), the most common reasons are as follows.
- The checkout page has been closed. The checkout page should not be closed before the payment is completed. If it's closed, the cron job function will still check payments but you should set it to run from your server, more details here.
- The amount sent is different from the one shown by Boxcoin. If the address is not dynamically generated, the amount sent must be the exact amount shown by Boxcoin or the payment will not be detected. Enable the generation of dynamic addresses to also accept amounts higher than the one shown by Boxcoin.
- The transaction is pending or has not been sent to the blockchain. Make sure the transaction is valid and has been sent. Use external websites like https://www.blockchain.com to check it.
- The service or wallet from which you sent the transaction is not working properly. Send the transaction from a personal wallet, not from an exchange. Transactions made from exchanges can create troubles and are not advised.
- Never use exchange addresses to receive payments, always use addresses from a personal wallet.
- Ensure that you are sending the funds to the main network and not to a testnet network. Alternatively, if you are in testnet mode, confirm that you are sending the funds to the correct testnet network.
WooCommerce order is not marked as completed
If you Boxcoin show the payment as completed, but the WooCommerce order is still pending. Check all of the following. To manually mark a WooCommerce order as completed, navigate to the Boxcoin > Transactions section. Find the specific transaction you wish to mark as completed and then select the Mark as completed option from the transaction menu.
- Disable all security plugins and try again.
- Make sure you are not blocking access to WordPress REST API.
Cross-domain configuration
If you want to show checkouts on domains other than the installation domain, including subdomains, your server must allow cross-origin requests. To enable cross-origin requests on your server, do the following:
Cross-domain configuration via server
- For Apache servers — Edit the .htaccess file of the domain where the plugin is installed and enter the code <IfModule mod_headers.c="">header('Access-Control-Allow-Origin: *');</IfModule> at the very top of the file. To make it works you need to have at least AllowOverride +FileInfo or AllowOverride All in the Apache config.
-
For nginx servers — Edit the file /etc/nginx/nginx.conf of the domain where the plugin is installed and enter the code
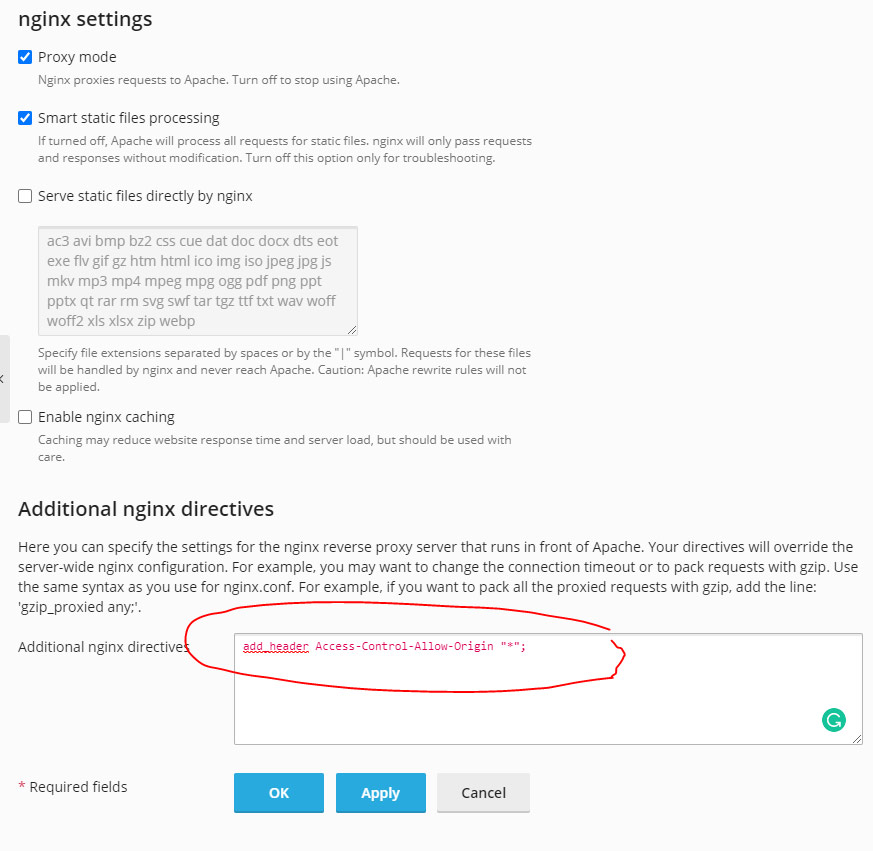
add_header Access-Control-Allow-Origin "*"; at the very top of the file. If you're using Plesk go to
Domains > example.com > Apache and nginx settings > Additional nginx directives and insert
add_header 'Access-Control-Allow-Origin' '*';. - For OpenLiteSpeed servers — Visit https://openlitespeed.org/kb/setting-up-cors-on-openlitespeed/.
You can view tutorials for the most common server administration software in the list below:
Cross-domain configuration via PHP
If none of the previous solutions work or you can't change the server settings, follow the steps below:
- Edit the file boxcoin/config.php and enter the code define('BXC_CROSS_DOMAIN', true); at the end of the file.
- Upload the following folder into your destination domain(the domain where the checkout should be shown, not the one where Boxcoin is installed): boxcoin/media/fonts. You can upload the files where you want, for example, http://www.example.com/icons. If the checkouts are loaded on multiple domains upload the files on each domain.
- Edit again the file boxcoin/config.php and insert the code define('BXC_CROSS_DOMAIN_URL', 'YOUR-URL'); at the end of the file. Replace YOUR-URL with the URL that points to the files you just uploaded, for example, http://www.example.com/icons. If the checkouts are loaded on multiple domains replace YOUR-URL with the an array of URLs, for example, ["http://www.example.com/icons", "http://www.example-2.com/icons"].
Hide admin.php from URL
By default, the admin URL is something like https://your-website.com/boxcoin/admin.php. You can hide the admin.php part of the URL and make it like https://your-website.com/boxcoin/ by inserting the following code in your .htaccess file:
<ifmodule mod_dir.c> DirectoryIndex admin.php</ifmodule>
Reset username or password of the admin account
If you can no longer log in to the admin area, you can reset your password and username by following the steps below:
- Edit boxcoin/config.php.
- To change username, change the value of the constant BXC_USER.
- To change your password, change the value of the constant BXC_PASSWORD. The new password must be saved as a hash. To generate an hash for your password visit https://board.support/docs/files/password.php?p=123456. Change 123456 with your password.
- Warning Changing login details will make settings encrypted with the old password unrecoverable, including addresses generated via nodes and their private keys. If you don't know the old login data and the password hash, you won't be able to recover the data in the future. The password hash can be found in the config.php file of the Boxcoin folder.
If you're using the WordPress version, you can also delete the config.php file and Boxcoin will generate it again on reload.
Address generation
Single address
By default, Boxcoin use the single address set in Settings > Cryptocurrency addresses for all transactions in the same cryptocurrency. More details below.
- Boxcoin detect the payment from its cryptocurrency amount, in which case, the amount is always unique for each transaction.
- The amount always changes less than 0.02% of the original amount.
- The user must submit the exact amount shown by Boxcoin or the payment will not be detected.
- The underpayments setting is not compatible with the single address method. You have to activate the address generation to use this setting.
Address generation
When using this feature Boxcoin generates a new and unique cryptocurrency address for each transaction.
- You can activate address generation via address list, nodes, Gemini, Coinbase, custom explorer.
- The transaction amount for the same FIAT amout remains the same.
-
If the user sends an amount different from the one show by Boxcoin(partial payment) the transaction is still recognized but is completed only if the amount is equal or more than the requested amount.
If the amount is less than the requested amount, and the underpayments setting is not active, the following happen:
- The transaction status is set to Underpayment.
- The amount sent and what remains to be sent are saved in the description of the transaction, view it from the Transactions area. Open the transaction menu to view the full description.
- The user sees a message showing that there is an underpayment. You can customize the message from Settings > Payment form texts.
- The webhook is not sent.
- The TransactionCompleted JS event is not sent.
- In case of WooCommerce, or with other integrations, the purchase is not completed.
-
You can activate multiple address generation methods and use them as backup methods if one method fails.
The priority is as follow:
- 1. Nodes - Address generation via node has priority and if active is always used first.
- 2. Custom explorer
- 3. Address list
- 4. Coinbase and Gemini - They are used only as last option.
- 5. Single address
- The number of decimals is limited to 2 if the cryptocurrency of the transaction is a stablecoin.
- You must add the addresses in Settings > Cryptocurrency addresses also if you use address generation.
Address list
This method generates the address using a list of addresses manually set by you.
- You have to add at least 3 addresses to activate the address generation.
- Add the addresses in Settings > Cryptocurrency addresses, separate addresses by comma.
- The first address is reserved and used only if no more addresses are available, in this case the single address method is used.
- If you use the whitelist function, you need to add all the addresses in the whitelist.
- The Boxcoin balance section controls only the first address.
- An address can be used again 24 hours after the last outstanding transaction or immediately after completing the transaction or if a transaction has been canceled. Your can stop the reusing addresses after 24 hours by checking Settings > Stop reusing addresses.
Underpayments
Activate the Settings > Accept transactions with underpayments option to start accepting underpayments. An underpayment occurs when the user sends an amount that is less than what Boxcoin requested.
- Only underpayments with a difference of 5% or less are accepted. If the user sends an amount that is less than 5% of the requested amount, the transaction will not be accepted.
- Underpayments only works if the address generation is active.
Webhook
Webhooks are automated data sent from Boxcoin to a URL set by you when something happens. Use the webhook to validate and finalize the purchase. For security reasons you should always validate the purchase via webhook. You must be a developer and know how to coding to setup the webhook.
How to validate a purchase
-
In Settings > Webhook > Webhook URL enter the destination URL. Boxcoin will send the data to this URL.
The URL must point to a file that read the data received, with PHP, you can use the code below to read the data.
$response = json_decode(file_get_contents('php://input'), true); - In Settings > Webhook > Webhook secret key enter a secret password of your choice. The password will be included in all webhook calls (see key value in the example below). Use it to verify that the webhook is sent by Boxcoin and not someone else.
-
Save the changes. Boxcoin will now start sending the below data when a payment is complete.
To validate the transaction you must check that the value of the key status is equal to C.
If the transaction was made from a dynamic checkout, you must also verify that the transaction amount_fiat value is correct and eqaual to the price amount of the purchased item.
{
    "key": "123456789",
    "transaction": {
        "id": "231",
        "title": "My checkout title",
        "description": "My checkout description",
        "from": "0xeb2629a2734e272bcc07bda959863f316f4bd4cf",
        "to": "0xcc1486157C47c4B76fe097fDD48c3CEDB20d01B6",
        "hash": "0x3c437c3245999087d8e0276e73f9411f0e593ccd5ed1feacb032724a8980a606",
        "amount": "0.001",
        "amount_fiat": "0.1",
        "cryptocurrency": "eth",
        "currency": "eur",
        "external_reference": "",
        "creation_time": "2022-04-14 10:00:00",
        "status": "C",
        "webhook": "1"
        "vat": {"amount":"0.33","percentage":"22","country":"Italy","country_code":"IT"}
    }
}
Information
- The webhook sent when a payment is confirmed is only ever sent 1 time.
Dynamic checkouts
To create checkouts by HTML code place the code below into the web page where you want to show the checkout.
<div data-bxc="custom-123" data-price=""></div>
URL
You can create a checkout page on the fly via the URL below. Replace [your-site] with your website URL. If you changed the directory name, replace boxcoin with the new directory name. For added security you can encrypt the parameter external_reference with the PHP API function bxc_encryption(). Use the URL paremeter lang=LANGUAGE_CODE to change language. If you are using the Cloud, SaaS, or Reseller version, the URL of document.location must also include &cloud=API-KEY. Replace API-KEY with the value at Boxcoin > Account > API key.
https://[your-site]/boxcoin/pay.php?checkout_id=custom-123&price=0&external_reference=ABC
WordPress shortcode
If you are using the WordPress version you can also use the following shortcode.
[boxcoin id="custom-123" price="" description="" type="inline"]
Attributes
If you are using the WordPress shortcode or the URL method remove the prefix data- from all attributes.
| Attribute | Description |
|---|---|
data-bxc |
The checkout ID. It must starts with custom-. |
data-price |
The price amount. |
data-external-reference |
Enter the string you want, it will be sent via webhook and as a redirect URL parameter. |
data-redirect |
Redirect the user to a specific URL after the purchase is complete. |
data-currency |
The checkout currency. Default: Settings > Currency. |
data-type |
Set the checkout type. Available options: inline, link, popup, hidden Default: inline. |
data-note |
Add a note to the transaction. If the checkout is via URL this attribute should be URL encoded. |
data-pay |
Force the user to pay with a specific cryptocurrency. Available options: the cryptocurrency code, e.g. btc. |
Warning Security measure
When using dynamic checkouts without encrypting attributes you must validate the payment via webhook and verify that the transaction amount_fiat value is correct and eqaual to the price amount of the purchased item.
Languages
Add custom translations
You can add custom translations to translate the strings of Settings > Payment form texts.
- Include a file named translations.json into the Boxcoin root directory. Download example here.
-
The content of the file is a JSON array like the one below. Replace LANGUAGE-CODE with the two-letters language code you would like to use.
Get the language codes list here.
Replace English string with the strings entered in Settings > Payment form texts, the strings must be in English and exactly the same.
Replace Translation with the string translation.
                                       {
                                          "LANGUAGE-CODE": {
                                            "English string": "Translation",
                                            "English string": "Translation",
                                            ...
                                          },
                                          ...
                                        }
Manually set the checkout language
You can force the checkout language via URL paramenter and JS variable. To set the language via URL parameter append the attribute ?lang=LANGUAGE-CODE to the client.js script link, e.g. <script id="boxcoin" src="[YOUR-URL]/js/client.js?lang=it"></script>. To set the language via JS variable insert the JS code <script>var BXC_LANGUAGE = "LANGUAGE-CODE";</script> into the checkout page, before the client.js script. Also, Settings > Languages > Payment form language must be set to Default.
Information
- Both admin-side and client-side are multilingual. You can set the languages from Settings > Languages.
- If the language is set to multilingual the language will be the browser language of the user.
- To check the checkout language you must be logged out. If you are logged in as an administrator, log out or open the payment page from another browser or use the browser's private / incognito window.
- If you are using the WordPress version and your website is multilingual, Boxcoin will use the active page language if Settings > Languages > Payment form language is set to Default. If you are using WooCommerce or Easy Digital Downloads, you need WPML or Polylang to redirect the user to the payment page in the correct language.
Custom tokens
You can add unlimited ERC-20 and BEP-20 tokens and start accepting payments with them.
Unlisted token
If your token is not listed on major cryptocurrency exchanges, Boxcoin cannot get your token's FIAT exchange rate. To solve this issue set the USD exchange rate of your token(set how much is the USD value of 1 token) in Settings > Custom token > USD exchange rate. To retrieve the exchange rate dynamically, input the URL in the Settings section under Custom token. The URL should directly provide the USD exchange rate when accessed using the HTTP GET method. For instance, refer to this example: https://boxcoin.dev/docs/files/exchange_rate.txt.
Listed token
If your token is listed on major cryptocurrency exchanges, enter all the required information in Settings > Custom token and you are done.
Information
- The setting Token code must contain the code of your token, it must be lowercase and without spaces or symbols, e.g. btc, eth.
Nodes
Connect Boxcoin to a node to enable powerful features such as address generation or transfer in a completely decentralized way, without using any third-party services. The cloud version doesn't support the following features because we don't manage the wallet keys for you, please use the PHP or WP version if you want to use those features: transfer to address, instant conversion.
Setup
- In Node URL enter the URL of your node. The URL should contain the authentication details, e.g. http://user:pass@127.0.0.1:1832.
- In Node headers enter any additional headers required for authentication. Use the following syntax: key:value,key:value,.... To enter basic authentication details enter Authorization: basic USER:PASSWORD. Replace USER and PASSWORD with your node username and password.
- See the nodes as a service section for a list of ready-to-use node providers.
Address generation
This feature generate a new and unique cryptocurrency address for each transaction.
- Once the payment is received, it is transferred to the node transfer address, if set, otherwise to the corrispong address set in Settings > Cryptocurrency addresses. The amount will be less than the received amount because of the network fee spent for the transfer.
- Generated addresses are reused 24 hours after the last payment. We do this for performance reasons and to save you money when using Ethereum.
- For more details see the address generation section.
- Warning If the transfer fails, you can retrieve the private key of the wallet containing the funds using either the PHP API function bxc_encryption() or the REST API function encryption. To decrypt, use the value stored in the database row btc-addresses or eth-addresses in the bxc_settings table. Decryption will reveal the addresses and their corresponding private keys.
- Warning Changing your Boxcoin login details could result in loss of funds, if there are locked funds in the generated addresses. More details here.
Address generation via Xpub - Bitcoin only
Address generation via Xpub is another way to generate Bitcoin addresses. It's more secure and generates fewer fees, but it's more complex to use.
- To enable the address generation simply enter the xpub key.
- The default address generation method supports alzo zpub and ypub keys. Address generation via node only supports xpub keys. If you only get the zpub key, convert it to an xpub key with a tool like https://github.com/jlopp/xpub-converter (download it and open the file index.html).
- Node address generation uses your node and the Bitcoin REST API to generate the address. Use it if your wallet doesn't support the address generated via the default method.
- You can get the xpub key from your wallet settings. All major non-custodial wallets like Electrum and Exodus can show it. It is recommended to use Electrum. Get the key from Wallet > Information.
- It's more secure because Boxcoin doesn't need any private keys to generate the addresses and only your wallet can access the funds sent to the generated addresses.
- Generate fewer fees because there is no need to transfer the amount from the generated address to your main address.
- If the Settings > Bitcoin Node > Transfer to address option is active, address generation via xpub is automatically disabled. Boxcoin does this because it doesn't have access to funds.
- Warning Not all wallets support the address generated via xpub by Boxcoin. Test with a small amount and see if your wallet shows the amount. If it doesn't show, your money can be recovered with your private keys but we don't provide any help for that. The support does not cover it. The Electrum wallet is compatible with Boxcoin addresses generated via xpub.
- Warning Because as xpub works, your wallet may stop checking addresses after 20 consecutive addresses with no balance. When testing, make sure you don't generate more than 20 addresses without sending any money to any of them.
Transfer to address
This feature automatically transfers the amount of cryptocurrency sent by the user to the dynamically generated address to an address set by you.
- If node address generation is enabled, Boxcoin will automatically manage and use the private keys of the generated addresses to perform the transfer.
-
If node address generation is not enabled, you need to enter the wallet private key in Settings > Wallets.
The private key must be that of the wallet of the address set in Settings > Cryptocurrency addresses.
Warning We strongly recommend using a wallet with low or no balance to avoid risking losing all your money! Don't use your main wallet. Use a new dedicated wallet, just for Boxcoin. - Boxcoin will attempt to make the transfer even if the address balance is not sufficient to cover the network fee. In that case the amount sent will be balance - fee cost and the balance of the address after the transfer will be zero or near zero in the case of Ethereum.
Transfer to address - Ethereum only
- If the payment received is not in ETH but in another token such as USDT or USDC, Boxcoin will send a small amount of ETH to the newly generated address to cover the network fee of the transfer.
- Since it is currently not possible to accurately estimate the network fee, a small amount of funds will be locked in the newly generated addresses. Boxcoin minimizes the locked amount by reusing the generated addresses every 24 hours.
- Warning Token transfer is currently expensive and could significantly reduce your earnings if the amount transferred is small.
Instant conversion - Ethereum only
This feature automatically converts the user-submitted cryptocurrency amount into another cryptocurrency such as USDT or USDC each time a transaction is completed.
-
To enable this feature you must enter the private key of your wallet in Settings > Wallets.
The private key must be the one of the wallet of the address set in Settings > Cryptocurrency addresses.
Warning We strongly advise using a wallet with low or zero balance to avoid risking losing all your money! Do not use your main wallet. Use a new, dedicated wallet, only for Boxcoin. - This feature is powered by Uniswap.
- If this function is active, the transfer function is disabled.
- Only ETH and ETH ERC-20 tokens are supported.
- Warning Token conversion is currently very expensive and may significantly reduce your earnings.
Refunds
More details about the refunds feature here.
Nodes as a service
Running your own node can be challenging. There are a number of services that run optimized node infrastructures for you, so you can focus on developing your application or product instead. The list below contains node providers that we have already tested with Boxcoin.
| Service | Setup |
|---|---|
| nownodes.io |
|
| alchemy.com |
|
| chainstack.com |
|
Lightning Network
Connect Boxcoin to a Lightning Network node to start accepting Bitcoin payments on the Lightning Network.
Setup
- In Node URL enter the URL of your Lightning Network node.
- In Macaroon enter your admin Macaroon in hex format.
- In Node headers enter any additional headers required for authentication. Use the following syntax: key:value,key:value,....
- See the nodes as a service section for a list of ready-to-use node providers.
Information
- Only LND nodes are supported. Details here.
- If the invoice generation fails (for example because there is not enough remote balance), the Boxcoin checkout goes back to the cryptocurrency list, informs the user of a problem and asks to use another cryptocurrency.
- Enable Settings > Email notifications > Lightning Network error to get notified by email when invoice generation fails.
- You can use Boltz to get remote balance.
Nodes as a service
Running your own Lightning Network node can be challenging. There are a number of services that run optimized node infrastructures for you, so you can focus on developing your application or product instead. The list below contains node providers that we have already tested with Boxcoin.
| Service | Setup |
|---|---|
| voltage.cloud |
|
Gemini
Use Gemini to enable powerful features like address generation or instant currency conversion.
Setup
- Enter Gemini > Settings > API or visit https://exchange.gemini.com/settings/api.
- Click Create API key and as Scope select Primary, under API key settings check Found management, Trading, Require session heartbeat.
- Copy API key and API Secret and paste them in Boxcoin > Settings > Gemini.
- In Gemini click Create API key.
Address generation
This feature generate a new and unique cryptocurrency address for each transaction. To use it, you just have to activate it, no configuration is needed. For more details see the address generation section.
Transfer to address
This feature automatically transfers the cryptocurrency amount sent by the user to the dynamically generated address to the addresses set in Settings > Cryptocurrency addresses every time a transaction is completed.
- To increase the security of this feature use the Boxcoin whitelist.
- This function is active only if the address generation function is active.
- The destination addresses are those saved in Settings > Cryptocurrency addresses, you need to add all these addresses to the Gemini whitelist, do it from Gemini > Settings > Approved addresses or got to https://exchange.gemini.com/settings/approvedAddresses.
- If the instant conversion function is active, this function is disabled.
Instant conversion
This feature automatically convert the cryptocurrency amount sent by the user to USD, EURO, GBP or other currencies every time a transaction is completed.
- Select GUSD only if you accept payment in BTC and ETH only. Conversion to GUSD is supported only with BTC and ETH.
- If this function is active, the transfer function is disabled.
Sandbox account
Check this box if you are using the Gemini sandbox account for testing purposes.
- Create a sandbox account from https://exchange.sandbox.gemini.com/.
- The sandbox account is not compatible with the address generation feature.
- The sandbox account is not compatible with the transfer feature.
- Bitcoin BTC is the only supported cryptocurrency when using a sandbox account.
Coinbase
Use Coinbase to enable powerful features like address generation or instant currency conversion.
Setup
- Visit https://portal.cdp.coinbase.com/.
- Enter the API keys area and click Create API key. Enter a name and check all the permissions, in Advanced Settings select ECDSA as Signature algorithm. Click Create & download.
- In Boxcoin > Settings > Coinbase > API key name enter organizations/[ORGANIZATION_ID]/apiKeys/[KEY_ID]. Replace [ORGANIZATION_ID] with your Organization ID. You can get it from https://portal.cdp.coinbase.com/organizations. Replace [KEY_ID] with the Key ID of the API key you just created. You can get it from the downloaded file or from https://portal.cdp.coinbase.com/apiKeys.
- In Boxcoin > Settings > Coinbase > Private key enter the private key of the API key you just created.
Address generation
This feature generate a new and unique cryptocurrency address for each transaction. To use it, you just have to activate it, no configuration is needed. For more details see the address generation section.
Transfer to address
This feature automatically transfers the cryptocurrency amount sent by the user to the dynamically generated address to the addresses set in Settings > Cryptocurrency addresses every time a transaction is completed.
-
To enable this feature you must enable the 2FA.
Go to you Coinbase security settings page and under 2FA Settings > Active methods add a new method, the method must be an Auth app like Google Authenticator.
You should see a QR code, scan it with the a QR Code scanner app. We suggest the privacy focused app QR-Scanner.
When you scan the QR code you will get a code like otpauth://totp/Coinbase:Authenticator%203?algorithm=SHA1&digits=6&issuer=Coinbase&period=30&secret=YVXXXX4ODMB4LXXXXLFN1XXXGH
Enter the secret part (e.g. YVXXXX4ODMB4LXXXXLFN1XXXGH) in Boxcoin > Settings > Coinbase > 2FA key. - To increase the security of this feature use the Boxcoin whitelist.
- This function is active only if the address generation function is active.
- If the instant conversion function is active, this function is disabled.
Instant conversion
This feature automatically convert the cryptocurrency amount sent by the user to your main Coinbase FIAT currency (e.g. USD) every time a transaction is completed.
- If this function is active, the transfer function is disabled.
Refunds
More details about the refunds feature here.
PayPal
Use PayPal to start accepting payments via PayPal. To get started, follow the steps below.
- Enter the PayPal email of the account that will receive the payments in Boxcoin > Settings > PayPal > PayPal email.
- Go to https://www.paypal.com/businessmanage/preferences/website. Click the top right profile menu click Account Settings > Website payments > Website preferences and set the Auto return for website payments to on. Enter http://# as URL.
Information
- You can create a sanbox account to make test payments at https://www.sandbox.paypal.com. To make a payment use a sandbox account from https://developer.paypal.com/dashboard/accounts.
- The details of the PayPal user who sent the payment are visible in the details of the Boxcoin transaction.
- Your site must use HTTPS or the Block non-encrypted website payment PayPal option must be disabled.
Stripe
Use Stripe to start accepting credit or debit card payments. To get started using Stripe, follow the steps below.
- Register a Stripe account at https://dashboard.stripe.com/register.
- Activate your account at https://dashboard.stripe.com/account/onboarding.
- Visit https://dashboard.stripe.com/webhooks and add an end point, in Endpoint URL enter https://BOXCOIN-URL/stripe.php, replace BOXCOIN-URL with the URL of your Boxcoin installation, e.g. https://boxcoin.dev/demo/admin. If you are using the cloud version, enter https://cloud.boxcoin.dev/stripe.php. Listen for the following events: checkout.session.completed.
- Create a new product from https://dashboard.stripe.com/products and copy the Product ID, e.g. prod_MAxqp5jYGKu2Sx, paste it in Boxcoin > Settings > Stripe > Product ID. With Boxcoin, a single product is utilized for all your sales, automatically applying the appropriate sale price. The product title should be generic, such as "Crypto Payment".
- Get the secret key from https://dashboard.stripe.com/apikeys.
- Mind that the amount must be greater than 1 USD ot Stripe may not work.
- Mind that in localhost the transaction will not be marked as completed because the Stripe webhook can not be received.
Information
- Activate Stripe Tax if you are using the Stripe Tax service.
Verifone
Use Verifone (formerly 2Checkout) to start accepting credit or debit card payments. To get started using Verifone, follow the steps below.
- Register a Verifone account at https://www.2checkout.com. You can choose the plan you prefer.
- Go to https://secure.2checkout.com/cpanel/webhooks_api.php (Dashboard > Integrations > Webhooks & API) and copy Merchant Code, Secret Key, and Buy link secret word, paste the values in Boxcoin > Settings > 2Checkout.
- Go to https://secure.2checkout.com/cpanel/webhooks_api.php (Dashboard > Integrations > Webhooks & API > IPN Settings) and add a new IPN URLs, enter the URL https://BOXCOIN-URL/verifone.php, replace BOXCOIN-URL with the URL of your Boxcoin installation, e.g. https://boxcoin.dev/demo/admin. In General IPN Settings select the trigger Authorized and approved orders (sent after electronic delivery) and save the changes.
- You will need to activate and verify your account before starting selling to real customers but you can use the payment details of the following page for testing purposes: https://verifone.cloud/docs/2checkout/Documentation/09Test_ordering_system/01Test_payment_methods.
- Mind that in localhost the transaction will not be marked as completed because the Verifone webhook can not be received.
Invoicing
- Invoices are not available for pending transactions.
- Invoices are deleted after 24 hours for security reasons. Administrators and users can re-generate them at a later time.
- The invoice generation link is https://BOXCOIN-URL/pay.php?invoice=ENCRYPTED-TRANSACTION-ID, replace BOXCOIN-URL with the URL of your Boxcoin installation and ENCRYPTED-TRANSACTION-ID with the encrypted transaction ID, e.g. https://boxcoin.dev/pay.php?invoice=8kjY56imsLMd89oklbv4. Encrypt the transaction ID with the PHP API function bxc_encryption(), the REST API function encryption, or the JS AJAX API function encryption. Add the URL attribute download to show directly the PDF.
VAT
- If you enable VAT validation you need to create an account at https://vatsense.com and enter the API key in Settings > VAT > Vatsense API key. This is a paid service but you have 100 free validations per month.
- Once checked, all VAT numbers, even the invalid ones, are saved in the Boxcoin database and excluded from any future verification.
- To deduct the VAT amount for valid VAT numbers, it is necessary to enable VAT validation.
- VAT is automatically calculated based on the user's IP address.
- VAT is only shown if the IP address is from a VAT-applying country.
- If VAT is enabled, your webhook must verify that the value is equal to or greater than the original value.
- If the invoice is enabled and the user changes the country of the invoice, the VAT country changes accordingly.
- The VAT amount is shown on the PDF invoice.
- The VAT rates are provided by https://vatstack.com and are updated periodically.
- VAT details are sent in the webhook and in the TransactionCompleted JavaScript event.
- VAT details are visible in the transaction details.
- VAT does not need to be enabled for WooCommerce and Easy Digital Download purchases because it is handled by WooCommerce and Easy Digital Download.
Custom Blockchain explorer
You can use a custom Blockchain explorer to analyze the blockchains and generate a new payment address for each transaction. To do that, follow the steps below. If you want to generate a new address for each transaction you can use https://api.blockchain.com/v3/#getdepositaddress.
Instructions
- In Settings > Custom Blockchain explorer enter the URLs to get the balance of your addresses (Balance URL), single transaction details (Transaction URL), list of the latest transactions (Transactions URL) and to activate the option that generate a new payment address for each transaction (Address generator URL). The base URLs must be the same for all cryptocurrencies, you must use the keyword {N} to automatically change the network URL part, {N} will be automatically replaced by btc, eth, doge based on the active cryptocurrency. Use {N2} to use bitcoin, ethereum, dogecoin instead. Use the keyword {R} to automatically set the address or transaction ID of the active Boxcoin transaction. For example, the URL https://blockscout.com/{N}/mainnet/api?module=account&action=balance&address={R} will become something like https://blockscout.com/btc/mainnet/api?module=account&action=balance&address=3EBVDZUU6M2Pvu4rAqHwNESDgXBfJTAz7r for Bitcoin balance and https://blockscout.com/eth/mainnet/api?module=account&action=balance&address=0x298b78d398dd02031c40a4ee42622856249aef3c for Ethereum balance.
-
In Balance path, Transaction paths, Transactions paths, Address generator path enter the JSON array paths of the values to get.
Use the following syntax:
key>subkey>..., key>subkey>..., ...
For example the Balance path of the following JSON response is result.{ "message": "OK", "result": "99639645964023592", "status": "1" } -
In Transactions paths enter the JSON array paths to get the following values:
transactions list path, transaction time in unix format, transaction address, transaction amount, number of confirmations, transaction hash.
The paths must respect this exact order.
For example, the Transaction paths value of the following JSON response is result,timeStamp,from,value,confirmations,hash.
{ "message": "OK", "result": [{ "blockHash": "0x06e8ae18e4e324d6efd438f95bfc532bab21680d852a6ac6e67021ce1227d8c5", "blockNumber": "14659898", "confirmations": "152333", "contractAddress": "", "cumulativeGasUsed": "29939474", "from": "0xeb2629a2734e272bcc07bda959863f316f4bd4cf", "gas": "21000", "gasPrice": "58000000000", "gasUsed": "21000", "hash": "0x3c437c3245999087d8e0276e73f9411f0e593ccd5ed1feacb032724a8980a606", "input": "0x", "isError": "0", "nonce": "5461738", "timeStamp": "1650972559", "to": "0xcc1486157c47c4b76fe097fdd48c3cedb20d01b6", "transactionIndex": "466", "txreceipt_status": "1", "value": "1000000000000000" }, { "blockHash": "0x0788ae1854e424d6efd438f95456ab21680d852a6ac6781ce12536d32", "blockNumber": "14659899", "confirmations": "152350", "contractAddress": "", "cumulativeGasUsed": "28939460", "from": "0xeb2629a2734e272bcc07bda959863f316f4bd4cf", "gas": "21000", "gasPrice": "58000000000", "gasUsed": "21000", "hash": "0x3c437c3245999087d8e0276e73f9411f0e593ccd5ed1feacb032724a8980a606", "input": "0x", "isError": "0", "nonce": "5461738", "timeStamp": "1650972559", "to": "0xcc1486157c47c4b76fe097fdd48c3cedb20d01b6", "transactionIndex": "468", "txreceipt_status": "1", "value": "3000000000000000" }], "status": "1" } -
In Transaction paths enter the JSON array paths to get the following values:
transaction time in unix format, transaction address, transaction amount, number of confirmations, transaction hash.
The paths must respect this exact order.
For example, the Transaction paths value of the following JSON response is result>timeStamp, result>from, result>value, result>confirmations, result>hash.
{ "message": "OK", "result": { "blockNumber": "14651093", "confirmations": "161012", "from": "0xccaad84ddf373751cceb9c2b5485810381d66972", "gasLimit": "260775", "gasPrice": "45791434002", "gasUsed": "190855", "hash": "0x24d6d2dd3992bfea4d0cedad5197a6c8fd291d87b138dba6d31b4ff28d59ac09", "next_page_params": null, "revertReason": "", "success": true, "timeStamp": "1650852706", "to": "0x7f268357a8c2552623316e2562d90e642bb538e5", "value": "173000000000000000" }, "status": "1" } - Set the setting Settings > Custom Blockchain explorer > Unit type to Satoshi | Wei | Dogecoin if the transactions value/amount is in Satoshi, Wei, Dogecoin. In the examples above the values are in Wei.
-
You can use blockscout.com to test this feature, here the details:
Unit type Satoshi | Wei | Dogecoin
Balance URL https://blockscout.com/{N}/mainnet/api?module=account&action=balance&address={R}
Balance path result
Transaction URL https://blockscout.com/{N}/mainnet/api?module=transaction&action=gettxinfo&txhash={R}
Transaction paths result>timeStamp,result>from,result>value,result>confirmations,result>hash
Transactions URL https://blockscout.com/{N}/mainnet/api?module=account&action=txlist&address={R}
Transactions paths result,timeStamp,from,value,confirmations,hash
Requirements
- All requests are made through the HTTP GET method. The custom explorer must support queries via HTTP GET method.
- The custom explorer must return data in JSON format.
Information
- We do not provide support for setting up your custom explorer. To get assistance, you can hire us.
- If the custom explorer is down or a query fails the default explores are autoamtiacally used insted.
- If the generation of a new payment address fails the default address is used instead.
- If the custom explorer does not support a cryptocurrency you can still use it, the default explorers will be used for the unsupported cryptocurrencies.
Refunds
Issue a refund from the Transactions area by clicking Issue a refund from the transaction menu.
- Enable refunds from Settings > Coinbase > Refunds, Settings > Bitcoin node > Refunds, or Settings > Ethereum node > Refunds.
- Coinbase refunds are supported by almost all cryptocurrencies, Bitcoin Node refunds only support Bitcoin refunds, Ethereum node refunds support refunds for Ethereum and all Ethereum-based cryptocurrencies.
- A cryptocurrency refund is a new transaction sent to the sender address of the original transaction and with the same amount as the original transaction. For this reason, you must have a sufficient balance of the transaction's cryptocurrency to cover the transaction amount.
- For security reasons, the address to send the refund to and the refund amount are obtained directly from the blockchain and verified with the transaction in the Boxcoin database. If the amounts or addresses do not match, an error will be displayed and the refund will not be sent.
- You can only issue refunds for completed or underpaid transactions.
- Refunds via nodes have priority over Coinbase.
Testnets
Testnets allow you to test Boxcoin and the exchange add-on without using real money. See the information below to undersatnd how to use them. When using testnet nodes you have to disable the node Address generation option.
Bitcoin Testnet
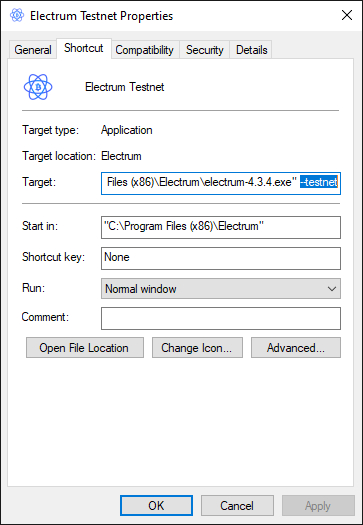
| Wallet | Use Electrum in testnet mode. To enable Electrum test mode in Windows, complete the installation and create a shortcut for electrum.exe. Open the shortcut properties window, then open the Shortcut tab and add at the end of the target string the value --testnet. |
| Getting Testnet Bitcoin | |
| Node |
Ethereum Sepolia
| Wallet | Use MetaMask. To enable the Ethereum Sepolia network click the top right network label and then click Add network, select the Sepolia network. |
| Getting Sepolia ETH | |
| Node |
Email Notifications
Configure the email notifications from Settings > Email notifications.
Information
- You can update the logo on the emails at Settings > Logo > Logo URL - PNG. Additionally, make sure to enable Settings > Logo > Display on the admin area.
- The logo in user emails will have no link attached to it, whereas the logo in admin email notifications will redirect to the Boxcoin admin area.
Problems?
Emails may not be delivered several reasons; below are the most common ones:
| Reason | Description | Solution |
|---|---|---|
| Hosting problems | The email server of your web hosting provider is not able to send emails or the emails are sent but they are automatically detected as spam and deleted by the email clients. | If the settings at Settings > Notifications > SMTP are not set, your server will send the emails instead. Contact your web hosting provider regarding email support or use your SMTP server by activating it in Settings > Notifications > SMTP. |
| SMTP problems | The email is not sent also if you activated the SMTP option in the Notifications area. | If you don't receive the emails make sure they are working by sending a test email from Settings > Notifications > Send a user email notifcation or Send an agent email notifcation. If you don't receive the test email, your SMTP server, is not working. Open the browser console for more details about the error. Because this is not an issue related to Support Board , the support doesn't cover it, please contact your server/hosting/SMTP support instead. You can use sendgrid.com, you can send 40000 emails for 30 days for free, then 100/day forever for free. |
| Google Gmail | The email is not sent also if you activated the SMTP option in the Notifications area and you are trying to the Gmail SMTP server. | If you're using Gmail enter smtp.gmail.com as host and set 465 or 587 as port. You need also to allow access to Gmail to less secure apps, you can do it from https://myaccount.google.com/lesssecureapps. |
URL rewrite
You can enable the URL rewrite from Settings > URL rewrite. The default URLs of Boxcoin are not user-friendly and they include parameters. You can rewrite the URLs via .htaccess file. The code below rewrites the URLs of the checkout and invoice pages. The checkout URL changes from pay.php?checkout_id=ID to /checkout/ID. The invoice URL changes from pay.php?invoice=ID to /invoice/ID. The direct payment URL changes from pay.php?id=ID to /id/ID.
<IfModule mod_rewrite.c>
  RewriteEngine On
  RewriteRule ^checkout/(.*)$/?$ pay.php?checkout_id=$1 [L,QSA]
  RewriteRule ^invoice/(.*)$/?$ pay.php?invoice=$1 [L,QSA]
  RewriteRule ^id/(.*)$/?$ pay.php?id=$1 [L,QSA]
</IfModule>
The values to insert in Settings > URL rewrite are checkout/ and invoice/.
Information
- We do not offer support for URL rewrite as it is not related to our product. To get assistance, you can hire us.
- The values of Settings > URL rewrite must always end with /.
- If you are using the cloud version this setting is not available.
Custom fields
Include additional custom fields in the checkout form from Settings > Checkout custom fields.
Information
- You can view the custom field values under the notes section in the transaction details.
- In the webhook and JS event, the custom field values are part of the notes value.
- The select field type should have a value format of field_name:option1:option2:option3. Replace field_name with the actual name of the field and option1, option2, and option3 with the select options, add as many options as you want.
Information
- Pending transactions older than 48 hours are deleted automatically. You can change the interval from Settings > Exchange rates refresh interval. Once a pending transaction is deleted, the receiving address linked to it will be available again.
- To disable a cryptocrrency from the payment options remove the cryptocrrency address.
- Multiple checkouts can be present in the same web page but only one will be active at same time.
- Boxcoin query the blockchain via AJAX every 5 seconds to verify the payment of pending transactions.
- To test a completed transction multiple times without a real payment add the following attributes to the checkout URL: ?demo=true&amount=[123]&id=[ID]&webhook_key=[key]. Replace [123] with the exact transaction cryptocurrency amount, [ID] with the Boxcoin transaction ID, [key] with the Boxcoin webhook secret key, this attribute is optional. The blockchain transaction time must be higher than the Boxcoin transaction time. If you are using the WordPress version, you have to set the webhook secret key.
- Add the debug=true attribute to the payment URL or admin URL to enable debugging in the browser console and PHP log.
Agents
You can create agents account to allow other people to access the Boxcoin admin area with limited privileges. Agents are not allowed to perform the following actions:
- View and save the settings.
- Create, save, and delete checkouts.
To create an agent account, edit the file config.php available in the Boxcoin installation folder and add the following code before the ?php> tag: define('BXC_AGENTS', [['USERNAME', 'PASSWORD'], ['USERNAME', 'PASSWORD']]); Replace USERNAME with the username of the agents and PASSWORD with the password hash of the agents. To generate a hash for your password, visit https://phppasswordhash.com/ or use the tool you prefer.
IP ban
Boxcoin permits a maximum of 10 unsuccessful login attempts within an hour. If you exceeds this limit, you will be barred from accessing the admin area for a duration of 1 hour. This blocking mechanism is based on the user's IP address and serves to deter brute force attacks aimed at uncovering login credentials. If you encounter the "Too many login attempts. Please retry again in a few hours." error, you have two options: either wait for a few hours or make changes to the Boxcoin database by deleting the ip-ban row from the bxc_settings table.
Two-factor authentication
To add an extra layer of security, activate Google Authenticator and enable two-factor authentication (2FA) for logging into the admin area. To do this, follow the instructions below:
- Activate Settings > Two-factor authentication.
- Click Pairing button and scan the QR code with the Google Authenticator app.
- Enter the code generated by the Google Authenticator app in the Code field and click Validation.
- This feature is not available in the WordPress version. If you are using the WP version, you can use the WordPress Two-Factor Authentication plugin and enable the 2FA in the WordPress login form.
Monero
- The Monero balance currently is not shown in the Boxcoin dashboard. We will try to add the support soon.
- The Monero payments are detected only if the transaction is within the last 5 block. If the transaction is older than 5 blocks it will not be detected. For this reason, the user should wait for the transaction to be confirmed before closing the payment page.
Shop add-on installation
- If you haven't already, buy and install Boxcoin and follow the instructions outlined in the installation section.
- Download the exchange add-on zip package from CodeCanyon and open it.
- Open the zip file shop.zip, extract the shop folder and upload it to the /apps/ folder of your Boxcoin installation.
- The shop add-on should be installed and active, verify this by visiting the Boxcoin settings area, scroll to the bottom and you should see the shop settings.
- In order for your users to make purchases using their credit or debit card, you have to activate either Stripe (more information can be found here) or 2checkout (more details are available here).
- In order for your users to make purchases using their PayPal, you have to activate PayPal, more information can be found here.
- In order for your users to make purchases using their cryptocurrencies, you have to save the wallet address of the cryptocurrencies you wish to accept in Settings > Cryptocurrency addresses.
- To start selling your first product create a checkout from Settings > Checkouts. Every checkout represents a product you are offering for sale.
License keys
Enable the generation of an unique license key per sale from Settings > Shop > License keys.
- You can disable and enable a license key from the transaction details panel.
- You can verify a license key via REST API, details here, or via PHP API, details here. Only license keys of transactions marked as completed are valid.
- To find a license key, simply enter it into the search bar located in the transactions area.
- The user will see the license key immediately after completing the purchase. You can also send the license key through the purchase confirmation email.
Discount codes
To crete a discount code follow the steps below.
- Add a new discount code from Settings > Shop > Discount codes.
- In the Discount code field enter the secret discount code. It can be an alphanumeric string or any desired value.
- In the Discount field choose the desired discount amount. To make the product free, set it to 100%.
- In the Checkout ID field, enter the checkout IDs that allow the discount code to be used. To allow all checkouts to use the discount code, enter all.
Information
- Custom dynamic checkouts do not allow discounts, therefore the discount field will not be visible in those cases.
Email notifications
To enable the email notifications you may have to configure the email notifications.
New sale notification
Receive email notifications for every new purchase that has been successfully made.
- Enable Settings > Email notifications > Payment received.
Purchase confirmation email
Once the purchase is completed, send the user a confirmation email.
- To collect the user's email address you have to enable Settings > User details > Email.
- The email should contains important details such as the invoice, license key, download links, and additional information. Use the following merge fields to display the relevant data: {license_key}, {user_name}, {invoice_url}, {checkout_title}, {downloads_url}.
Information
- The shop page URL is [YOUR-URL]/shop.php, replace [YOUR-URL] with the URL of your Boxcoin installation. Alternatively, you may go to Settings > Shop page. From there, simply click on the link provided in the description. You can set the shop page as the root page of your domain by uploading this .htaccess file to the root directory of your website.
- The files uploaded in the checkout area are secure files that can only be downloaded by the customer once the purchase has been made. Once the purchase is complete, the downloads will be start automatically. You can also send the download link via the purchase confirmation email, by entering the merge field {downloads_url}.
- The downloads are automatically deleted as soon as the download is finished. Additionally, a cron job function is executed to remove the files.
- To enable the uploading of new file extensions, edit the config.php file in the Boxcoin installation directory and add the constant define('BXC_FILE_EXTENSIONS', []). The value must be an array containing all the allowed extensions, e.g. define('BXC_WHITELIST', ["psd", "exe"]).
- Pending transactions are similar to abandoned carts. By default, they are automatically removed every 24 hours but you can adjust the interval from Settings > Interval for deleting pending transactions.
- To find a customer, simply input their details, such as email address, into the search bar located in the transactions area.
Exchange add-on installation
- If you haven't already, buy and install Boxcoin and follow the instructions outlined in the installation section.
- Download the exchange add-on zip package from CodeCanyon and open it.
- Open the zip file exchange.zip, extract the exchange folder and upload it to the /apps/ folder of your Boxcoin installation.
- The exchange add-on should be installed and active, verify this by visiting the Boxcoin settings area, scroll to the bottom and you should see the exchange settings.
- Set up your Bitcoin and Ethereum nodes, they are required to allow Boxcoin to send the exchanged cryptocurrencies to users. For more details on configuring nodes, click here.
- Enter your personal Bitcoin and Ethereum wallet keys under Settings > Wallets. They are required to allow Boxcoin to send the exchanged cryptocurrencies to users.
- In order for your users to purchase cryptocurrencies using their credit or debit card, you have to activate either Stripe (more information can be found here) or 2checkout (more details are available here).
- In order for your users to purchase cryptocurrencies using their PayPal, you have to activate PayPal, more information can be found here.
-
To display the exchange area insert the code below into a page of your website.
Replace [YOUR-URL] with the URL of your Boxcoin installation, e.g. https://example.com/boxcoin/js/client.js.
<script id="boxcoin" src="https://[YOUR-URL]/js/client.js"></script>
<div id="boxcoin-exchange-init"></div>
See the installation section for more details.
Email notifications
Setup
- To enable the exchange email notifications you may have to configure the email notifications.
Notifications
| Low balance | Notification sent if the balance of any cryptocurrency is below the threshold value of the Low USD Balance Threshold setting. Boxcoin automatically converts the cryptocurrency balance into USD to check if the threshold has been reached. This notification is sent no more than once every 24 hours. |
| Amount exceeds balance | Notification sent if a user attempts to make an exchange for more than the available balance. |
| Exchange completed | Notification sent when an exchange has been successfully completed. |
| Exchange failed | Notification sent if an exchange can not be completed due to an error. |
Identity verification
ComplyCube setup
- Create a free account at https://portal.complycube.com.
- Create an API key from the developers area (https://portal.complycube.com/developers) and paste it into Boxcoin > Settings > Identity verification > ComplyCube API key.
- When ComplyCube is in test mode, you can verify identity by uploading any document and using any image. The verification will always be successful.
Email verification
- The email is verified via OTP method. To enable it you may have to configure the email notifications.
Information
- The Minimum Amount setting must be a USD, however it works for any currency. Boxcoin automatically converts any currency to USD to check the amount.
- You can find an exchange transaction from the Boxcoin's Transactions area by searching for the checkout ID.
WordPress
There are two WordPress versions of Boxcoin.
WooCommerce
To start accepting cryptocurrency payments in your WooCommerce shop, follow the steps below.
On-premise version
- Create a new WordPress page and insert the shortcode [boxcoin-pay] into it. Save the URL of the page just created in Boxcoin > Settings > WordPress > Payment page URL.
- From the WordPress administration area go WooCommerce > Settings > Payments activate the Boxcoin payment gateway.
- In Boxcoin > Settings > WordPress > Payment page URL enter the checkout page URL and save.
Cloud version
- Install and activate the plugin https://wordpress.org/plugins/boxcoin-cloud.
- From the WordPress administration area go to Settings > Boxcoin and enter the required information. Get the Webhook secret key from https://cloud.boxcoin.dev > Settings > Webhook > Webhook secret key, if it is empty you have to enter whatever key you want. Get the Cloud API key from https://cloud.boxcoin.dev > Account > API key.
- From the WordPress administration area go to Settings > Boxcoin and copy the Webhook URL, paste it into https://cloud.boxcoin.dev > Settings > Webhook > Webhook URL.
- From the WordPress administration area go WooCommerce > Settings > Payments activate the Boxcoin payment gateway.
Information
- Check the option Do not finalize order to prevent a WooCommerce order from being finalized upon payment completion
Easy Digital Downloads
To start accepting cryptocurrency payments in your Easy Digital Downloads shop, follow the steps below.
On-premise version
- Create a new WordPress page and insert the shortcode [boxcoin-pay] into it. Save the URL of the page just created in Boxcoin > Settings > WordPress > Payment page URL.
- From the WordPress administration area go WooCommerce > Settings > Payments activate the Boxcoin payment gateway.
Cloud version
- Install and activate the plugin https://wordpress.org/plugins/boxcoin-cloud.
- From the WordPress administration area go to Settings > Boxcoin and enter the required information. Get the Webhook secret key from Boxcoin > Settings > Webhook > Webhook secret key. Get the Cloud API key from Boxcoin > Account > API key.
- From the WordPress administration area go to Settings > Boxcoin and copy the Webhook URL, paste it into Boxcoin > Settings > Webhook > Webhook URL.
- From the WordPress administration area go to Downloads > Settings > Payments and activate the Boxcoin payment gateway.
Information
- Boxcoin will save the WooCommerce order ID in the transaction.
- Boxcoin will automatically complete WooCommerce orders that include only downloadable or digital products. Orders containing physical products will be marked as processing but they will not be completed.
Shopify
To start accepting cryptocurrency payments in your Shopify store, follow the steps below.
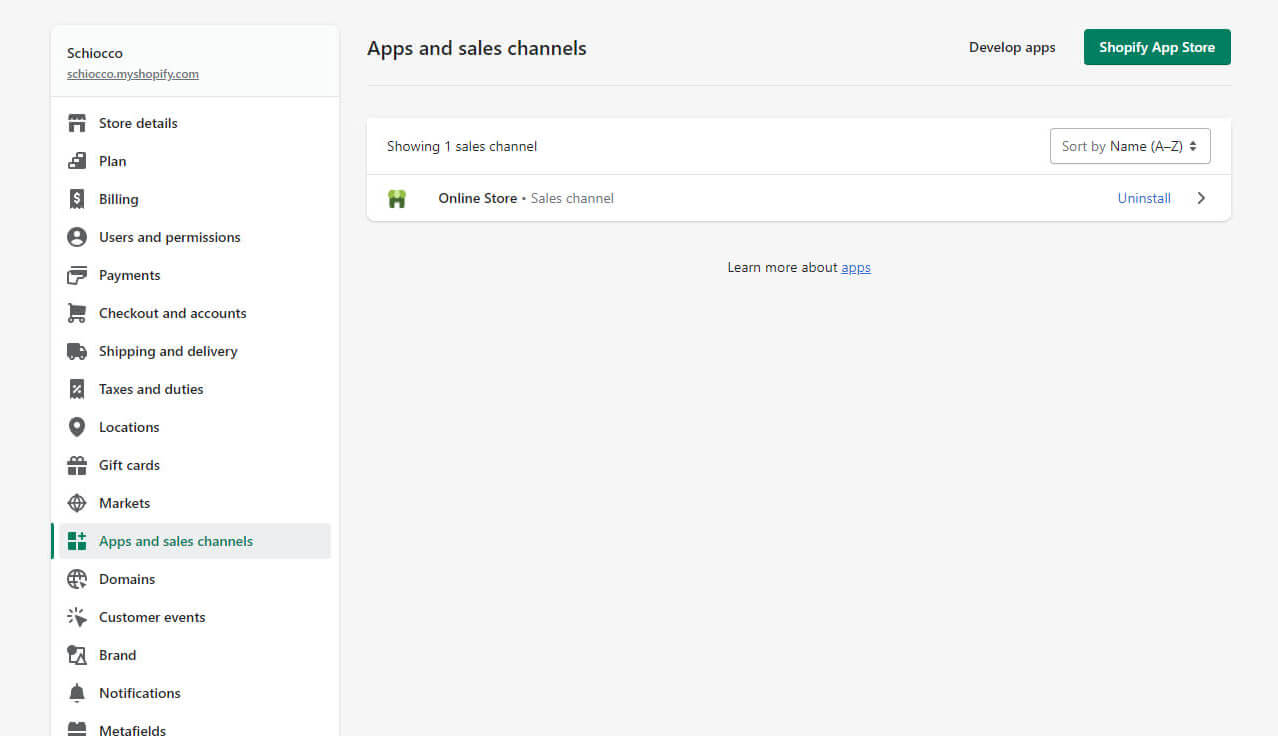
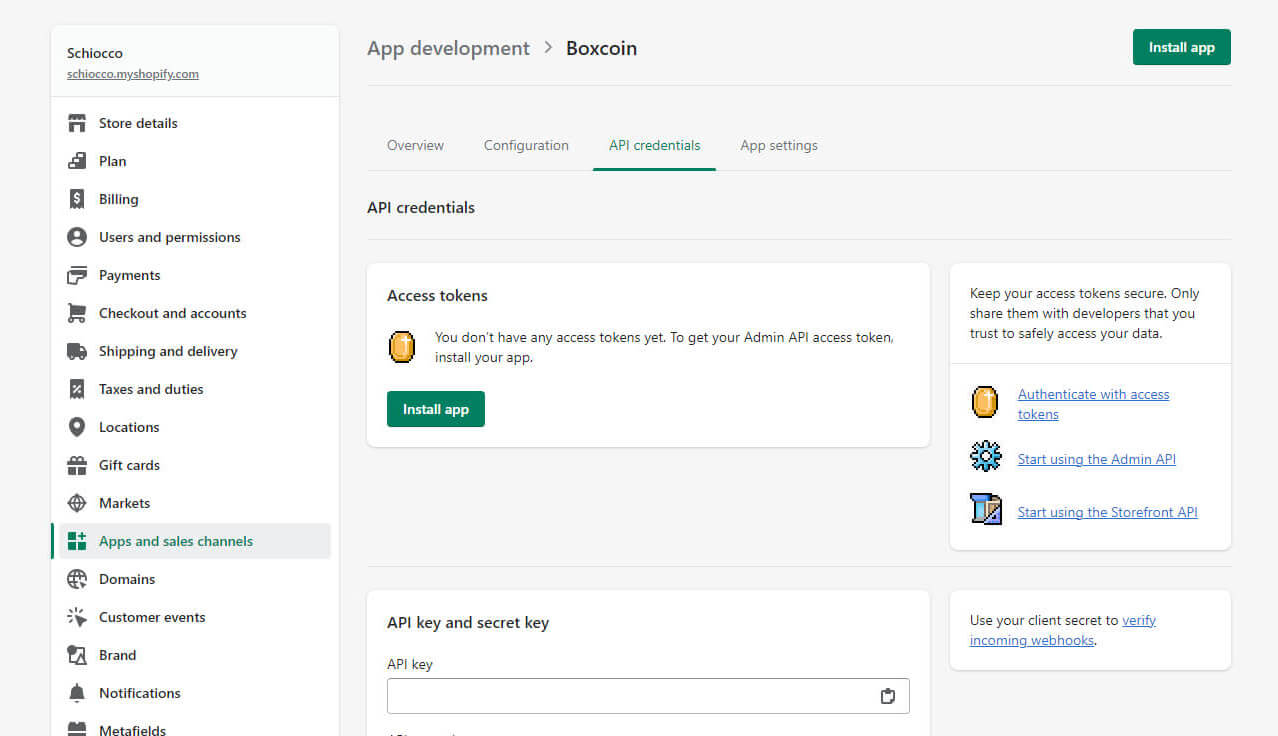
- Open your store settings area and click Apps and sales channels, then click Develop apps.
- Click Create an app, enter the app name you want, and create the app.
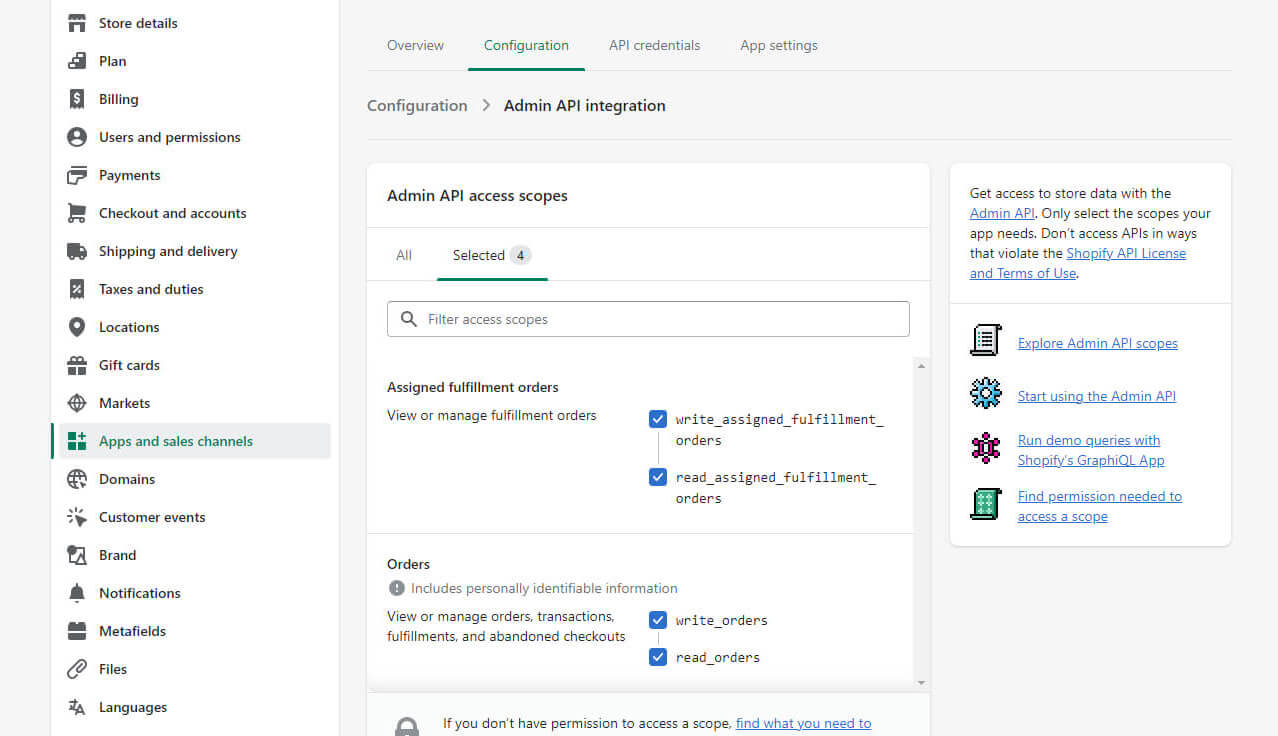
- Click Configure Admin API scopes and select the following: write_assigned_fulfillment_orders, read_assigned_fulfillment_orders, write_orders, read_orders.
- Open the API credentials tab and click Install app, after the installation copy the API access token and paste it into Boxcoin > Settings > Shopify > Access token.
- In Boxcoin > Settings > Shopify > Store URL enter you store URL, e.g. https://schiocco.myshopify.com.
-
Open again your store settings area and click Checkout and accounts, insert the following code into the Order status page field:
<script> if (!window.location.search.includes("cryptocurrency")) { let BOXCOIN_URL = "http://example.com/boxcoin"; let BOXCOIN_PAYMENT_METHOD_TEXT = ["Pay with Crypto"]; let BOXCOIN_INTERVAL = setInterval(function () { let element = document.getElementsByClassName("payment-method-list__item__info"); if (element.length) { if (BOXCOIN_PAYMENT_METHOD_TEXT.includes(element[0].innerHTML)) { document.location = BOXCOIN_URL + "/pay.php?checkout_id=custom-shopify&price=" + Shopify.checkout.payment_due + "¤cy=" + Shopify.checkout.currency + "&external-reference=shopify_" + Shopify.checkout.order_id + "&redirect=" + encodeURIComponent(document.location.href) + "¬e=Shopify Order ID " + Shopify.checkout.order_id } clearInterval(BOXCOIN_INTERVAL); } }, 50); } </script>Replace http://example.com/boxcoin with your Boxcoin admin URL, without the /admin.php part. If you are using the Cloud, SaaS or Reseller, version, the URL of document.location must also include &cloud=API-KEY. Replace API-KEY with the value at Boxcoin > Account > API key. - Open again your store settings area and click Payments, then click Add manual payment method and Create custom payment method. As Custom payment method name enter Pay with Crypto. You can change "Pay with Crypto" with something else but in such a case you have to replace it also on the code of the previous point. If you add translatons you have to add them in the code of the previous point, e.g. let BOXCOIN_PAYMENT_METHOD_TEXT = ["Pay with Crypto", "Pagar con Cripto", "ادفع باستخدام Crypto"];.
WHMCS
To start accepting cryptocurrency payments in your WHMCS website, follow the steps below.
- Download the WHMCS module from https://boxcoin.dev/docs/files/whmcs-boxcoin-module.zip.
- Copy and paste the boxcoin.php file into WHMCS\modules\gateway.
- Copy and paste the callback\boxcoin.php file into your WHMCS\modules\gateways\callback.
- Enter your WHMCS admin area and at the top-right click the gear icon, then click on Apps and integrations and search for "boxcoin", wait and it should appear in the search results, activate it.
- Save the URL of your Boxcoin admin area in WHMCS > Payment gateway > Boxcoin > Boxcoin URL. E.g. https://www.example.com/boxcoin/admin.php. If you are using the cloud version, the URL is https://cloud.boxcoin.dev.
- Copy your webhook key from Boxcoin > Settings > Webhook > Webhook secret key and paste it into WHMCS > Payment gateway > Boxcoin > Webhook secret key.
- Copy the webhook URL from WHMCS > Payment gateway > Boxcoin > Webhook URL and paste it into Boxcoin > Settings > Webhook > Webhook URL.
- If you are using the cloud version, copy your API key from Boxcoin > Account > API key and paste it into WHMCS > Payment Gateways > Boxcoin > Cloud API key.
Open Cart
To start accepting cryptocurrency payments in your Open Cart shop, follow the steps below.
-
Download the Open Cart module from the links below:
Version 3 https://boxcoin.dev/docs/files/boxcoin-v3.ocmod.zip.
Version 4 https://boxcoin.dev/docs/files/boxcoin-v4.ocmod.zip. - Enter the Open Cart admin area and click Left menu > Extensions > Installer. Click the top-right blue icon to upload the extension.
- Go to Left menu > Extensions > Extensions, select Payments as extension type and install the Boxcoin extension. After the installation is complete click the blue pencil icon Edit to enter the Boxcoin settings area.
- In Boxcoin URL enter the URL of your Boxcoin admin area. E.g. https://www.example.com/boxcoin/admin.php. If you are using the cloud version, the URL is https://cloud.boxcoin.dev.
- In Webhook key enter the webhook key. Get it from Boxcoin > Settings > Webhook > Webhook secret key. You can enter any string you want.
- Copy the webhook URL and paste it into Boxcoin > Settings > Webhook > Webhook URL.
- If you are using the cloud version, copy your API key from Boxcoin > Account > API key and paste it into the Cloud API key field.
- Enable the Boxcoin payment gateway and save.
Information
- You can set the default order statues in OpenCart > Settings > Options. The Complete Order Status must must be only one or it will always use the default Order Completed status.
Credit balance
The credit balance represent the fees you pay us for using Boxcoin. More details about how it works can be found in the points below.
- Each transaction is subject to a fee of 0.08%. A transaction worth USD 100 will generate a fee of USD 0.8, for example.
- When your credit balance goes negative your checkouts are blocked and your customers cannot make payments. For the checkouts to reactivate, credit must be added.
- In the event that your credit balance is negative and a user attempts to pay, an email is sent to inform you that your checkouts are blocked.
- Add credit to your account from Settings > Account > Add credit to your account.
- You will receive an email when your credit balance falls below USD 5. A maximum of one notification will be sent every 7 days.
- When you register, you will receive a USD 1 credit that allows you to transact for a total of USD 125.
Custom domain
In order to connect your domain, you'll need to have a DNS A record that points to the IP 137.66.30.211. If you already have an A record for that address, please change it to point at 137.66.30.211 and remove any other A records for that exact address. It may take a minute or two for your SSL certificate to take effect once you've pointed your DNS A record.
- In order to access this feature, a minimum credit purchase of 50 USD is required.